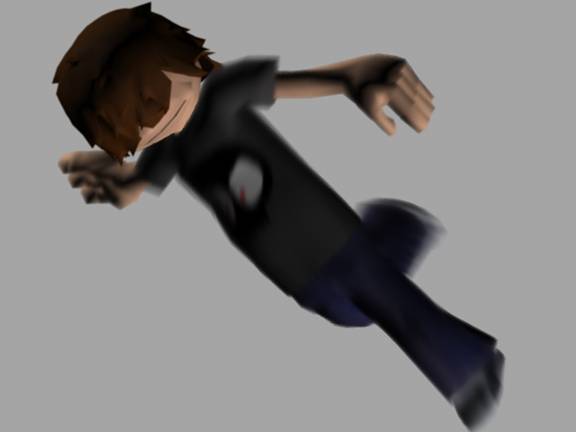
Creating Cal3D Characters with 3D Studio MAX

Contributed by James Allen < jamesa@vrac.iastate.edu >
All images and content © 2003 by James Allen


Part 1: The Basics


The joy of creating a virtual character or creature is that the possibilities are limitless on what they can do. The exciting thing is that as computers get faster, the more it is possible to create and bring to life virtual worlds, full of interacting people and creatures. As animators, it is our job to animate, or breathe life into 3D models.

This tutorial assumes that you have a low-polygon model ready for animation. It also assumes that you have a basic knowledge of terminology in computer graphics, and a good knowledge of 3D Studio Max. For this tutorial, I'm using Max 5.1 with Character Studio 4.0.

If you are a novice MAX user, I'd suggest the tutorials that come with MAX, as they are very well written and will give you a basic knowledge of this wonderful program.

First, we've got to go over some basics of what actually goes on when animating a character. By knowing these basics, you can then use this tutorial to fit your own needs.

For those of you not familiar with Character Studio at all, it is a plug-in that ships with 3DS Max, which makes the process of rigging a character much easier. What's rigging a character you ask? A character is your mesh or model that needs to be animated, and before it can be animated, we need to create a system of hierarchies that act as a skeleton. It is this skeleton that we actually animate.

Like in our own bodies, our virtual characters get bones as well, and not only do these bones act as a controlling structure, but also can control deformations such as muscle bulge, etc. Character Studio takes Max's already great bones system, and simplifies it, making it much faster and easier to rig a character. It is possible, and sometimes necessary to combine the Character Studio Biped and Max's traditional bones, i.e. a third leg or arm, or perhaps a bunch of tentacles, etc.

This brings me to the basics of Character Studio. Character Studio consists of 2 programs within the package: Biped & Physique. Biped is the skeleton structure that will control your character. Physique is the modifier you give your character that links it to Biped, thus allowing Biped to have complete control of your character.


Part 2: Rigging


All right, now we can finally start setting up our mesh! Load your model into Max: it's time to get started! Okay, I've got my Max with 4 views, which is the default mode: Top, Front, Right and Perspective in the lower right corner. Make sure your model is in the center of the workspace, which is 0 for the X and Y axes, and the feet should be at 0 for the Z axis. This way, when we export to Cal3D, it will be properly aligned with the coordinate axes (see figure 1).


Figure 1 : Window setup

The character I'll be rigging today is Jason (see figure 2), who is one of the kids in an animation I'm currently working on. Because we don't need to edit Jason just yet, we'll select all the pieces that make up Jason's arms, head, legs, feet and shirt.


Figure 2 : The "Jason" character


Setting up the Biped

Once you have your entire model selected, first hit Alt-X, which turns him semi-transparent. After he's transparent, right-click on or around him and freeze him
(see figure 3). We'll thaw him out soon enough. We freeze him so we don't accidentally click on him while we're setting up the Biped.


Figure 3 : Freezing a model

Now, click on the Create tab, and go to the Systems button. Click on the Biped button (see figure 4). In the front viewport, click and drag from the bottom of the feet to the top of the Biped's head. Click on the Motion tab, and then select any one of his appendages. Under the Motion tab, you'll get a whole gamut of settings and options will appear. Click on the little icon that resembles a stick figure. This will put us in Figure Mode, which allows us to configure the Biped to conform to our character. Figure Mode is used for rigging our character, as well as change settings without affecting animation.


Figure 4 : Creating a biped object
 
Moving right along, you'll see under the initial icons, Track Selection, Copy/Paste, and Structure. If it isn't already visible, click on the Structure rollout. Because Jason isn't a super complex character, many of the Biped's settings can remain the same, but here is how I have set him up for Jason (see figure 5). Just a few things have changed from the default, like number of fingers, links, etc. As you can see, you can give your model a ponytail, braids, props, more leg or spine links, and even have forearm twist, with as many as 10 links! This provides much more realism when rotating the wrist, but for today we'll leave that option unchecked.


Figure 5 : Biped settings

Now that we've explored the Structure rollout, we need to make the Biped conform to the physiological standards of Jason. In the front viewport, click on the triangle-looking thing located at the Biped's pelvis (see figure 6). This is the Center of Mass, which acts as the base point for all of the Biped. Select the Center of Mass and position it right at the crotch area of your model (as in figure 7).


Figure 6 : The biped's center of mass


Figure 7 : Placement of the center of mass

Next, select the right arm & hand, clavicle, and the left leg & foot. Right click and hide these appendages. Now select the Pelvis object and click on the Non-Uniform Scale icon -
. This is the icon next to the Move icon. If the Uniform Scale button is visible, notice the little arrow at the lower right indicating more tools, so press & hold with the left mouse button for a couple of seconds, and you'll get to choose from available scaling tools.

Use this to scale the pelvis so that the left leg is roughly in the middle of Jason's left leg. Then start working your way down his left leg by scaling length & relative shape. Keep in mind that Character Studio 4's new Biped object is much more skeletal shaped than in previous versions, thus thick bones are not needed. As you are scaling, make sure to line the knees up, and move the feet into position.
 
The spine needs to be a bit bigger as well. Starting with the base of the spine, scale it just a bit, and then go on to the next link, on up to the neck. They should be about the same size, and put the shoulders and neck in the correct position.


The Biped's head needs to be a bit bigger. Using our Non-Uniform Scaling tool, we scale it to be about the size of Jason's head. You may have to also scale the spine a bit as well. Last but not least, scale the arms, hand, and fingers to match our model. When finished, the left side of your character's Biped object should be closely matched with its mesh, as in figure 8 below.


Figure 8 : Finished left-hand side of Jason's biped object

Once you've gotten the left side all set up, its time to get the rest of the Biped in order. A very nice thing about Character Studio 4 is the Copy/Paste rollout. Drag your mouse and select the whole Biped that's visible. Then, click on the Copy/Paste rollout and under that, the Posture button. Click on Copy Posture. Now, unhide the rest of the Biped, and hit Paste Posture Opposite. This will take all of our changes that we made to the left side, and bring them to the right side, thus making the Biped symmetrical. If you are satisfied with your Biped, it is a very good idea at this point to click on the diskette icon, which will allow us to save our Biped figure and all of our presets. Many times I will start animating and forget to turn off Figure Mode, thus losing my neutral pose.


Figure 9 : Copying biped posture from left to right sides


Applying the Physique modifier

Now it's time to assign the Physique modifier.  In a viewport, right-click and hit Unfreeze All. Now that Jason is all thawed out, click on his feet. For Jason's character, because he has many parts (i.e. the legs are separate from arms) we will give each part a Physique modifier. Click on the Modifier tab, and it will be under the modifier list. You can add it to a custom button by clicking on the little button icon in the upper right corner of the Modifier rollout (see figure 10).


Figure 10 : The Physique modifier rollout

Select each part of your model and give each part a physique modifier. After assigning Physique, click on the Link to Root Node button , and then clicking on the Center of Mass for the Biped. When you do this, a window will appear which allows you to preset how Physique sets up its influences. For this tutorial, we'll just leave it as default. It really doesn't matter what order you apply physique, but if you have many, many parts to a model it's good to do it in some sort of order, so you remember which piece does and does not have the physique modifier.
 
Now that they all have Physique applied, if you have multiple meshes in your character, like Jason does, click on the legs mesh. You will notice that it has many sub-objects similar to your editable mesh or poly that you're working with. Of all the sub-objects available, we will only be focusing on the envelope and vertex sub-objects. The envelope sub-object allows for editing of envelopes, which determine which bone affects which vertices. When you click on the Envelope sub-object, you'll notice lines drawn through your mesh, corresponding to the Biped. These are called Links. If you select a link, you'll notice a balloon-shaped thing that surrounds the link. You'll also notice the vertices that it encompasses or is near to are shaded. These are the vertices that will be influenced by that link, and in turn, that particular bone. You can have multiple bones affect a single vertex, and sometimes you want that, and sometimes it can be a pain in the ass.
 
Okay, now go to the Vertex Sub-Object mode. You'll see three colored crosses. The Red indicates deformable vertices, the Green are rigid vertices, and the Blue indicates that they aren't influenced at all by a bone, or are root vertices.
 
Next, get out of sub-object mode and click the Biped's left foot and go to your Motion tab. Unclick the Figure Mode button and move the Biped's foot to his left. You'll notice that some vertices from the right leg might be dragged along and some from the left leg might be left behind (see figure 11). Now click on the Key Info rollout and click Create Key. This will create a key at frame 0 so we can see what vertex weights need to be edited.


Figure 11 : Moving Jason with the Physique modifier
 
Going back to Physique, first go into Envelopes sub-object mode and click on the L Thigh link, bringing up its envelope. Looks like it needs to be a bit bigger. Using the Radial Scale spinner, increase the envelopes overall scale and watch as the rest of our leg is influenced. The problem that we have now is that parts of the other leg are influenced by this larger envelope. Don't worry about that for now and work your way down the leg, increasing or decreasing the envelopes to encompass your mesh. Once you have the left leg envelopes done, do the same to the right leg (his right, not yours). Now, if the bones were placed properly and the envelopes aren't too big or too small, your envelopes won't influence the wrong leg. If your envelopes DO influence the wrong leg, after you've sized each envelope, go into the Vertex sub-object mode. Make sure the select button is pressed, and select the problem vertices. If they are from the left leg, and are influenced by the right leg, click on Remove from Link and select the right thigh and calf links. This will remove those links from influencing those vertices.


Figure 12  : The envelope around Jason's forearm

Now we repeat this process to locate other naughty vertices.
 
Okay, the head is a bit different, as you don't want it to deform as you move the head, so select all the vertices above the neck and remove the neck links influence from them first. Next, we want to assign a Rigid influence on them to the Head link so click on Assign to Link. Now, remember the three colored cross buttons? Right now, the red should be depressed. Depress the green instead, which means that any link we then select, it assigns a rigid influence over, so it doesn't deform. This is very useful if you have a robot with hard metal or armor on a character that you dont want stretching or deforming.
 
Now repeat this process if there are other rigid objects in your character.
 
After you've edited all the vertex link assignments, it is a good idea to Lock the assignments, and if further editing is required, once the vertices are locked, you can type in their weights for precise control. This can be helpful around the underarm and anywhere else that just seems to be influenced improperly. Keep in mind that you can't change link assignments unless the selected vertices are Unlocked.

Rigging can be the longest and worst part of character animation, and you'll be glad once it's over. The biggest thing to remember is to do it right the first time, and take the time to rig your character well, otherwise animating him can give you much more grief. 


Part 3: Animation


Finally done with rigging! Now let's create a simple walking animation.


Figure 13 : Walking animation keyframes


To begin, click on a part of the Biped again and go into the Motion tab. What we'll be making is a simple walk cycle, and we won't be using Character Studio's popular Footstep mode either.

Some Basics of Animation

Traditional cell animation is usually accomplished by artists drawing the keyframes first, and then later filling in with the in-betweens. For example, on frame 1, a character is standing, then on frame 8, he's in the air, and by frame 20 he's on the side of a building. These would be the keyframes, and the poses that make up his actions between these frames would be, yes you got it, the in-betweens. The way you work in Max is a bit different, but very similar. First, put your initial poses and keyframe in the large poses until you've got your animation. Then come back in and tweak the poses in-between each frame so that your character acts and behaves smoothly.

For our walk cycle, make sure you have your character physiqued, then if you want you can hide your mesh and just work with the bones. This helps if your computer isn't fast or you have many polygons or large textures. Sometimes I like to keep the mesh visible so I can see how it reacts to certain poses.

Now to start animating Jason. Click on the Time Configuration dialog box (see figure 14) and make the starting frame 1 and the ending frame 32. This is an even number, which makes it easy for keyframing. I set the first keyframe to 1 because we want the animation to loop evenly, which it must be one keyframe less, so it sets back up for the first one in the sequence.


Figure 14 : The Time Configuration dialog box

Using the rotate and the move commands, position your Biped in an extended stride position. In figure 15, I have set the right foot and the left arm forward, and the left foot and right arm back.


Figure 15 : A single keyframe of animation

Here's where observation of people and their movements is critical. If you look at someone walk, you'll notice that not just their legs and arms move, but the spine, hips, and shoulders as well, even if the walk is basic, like the one we're making.

Select the pelvis. Since his right leg is the one taking the step, all the weight will be placed upon the right foot, so in the front viewport, rotate the pelvis just a tad so the right foot is lower than the left (see figure 16).


Figure 16 : Pelvis rotation during walk animation

The spine also moves to compensate for weight distribution. Click on the Spine bone, and while holding CTRL, select Spine 1, Spine 2, and Spine 3. Rotate these in the opposite direction of the pelvis, so they curve just slightly to the left of the character (as in figure 17).


Figure 17 : Spinal rotation during walk animation

Now, you'll also notice when someone walks, the pelvis, spine and shoulders also rotate just a bit around the Z-axis, i.e. when the left arm is forward, they are rotated from left to right. Don't overdo this rotation.

Simple practice and observation of people walking and their movements will allow you to make better, more realistic movements.

In the Motion tab, still with part of the Biped selected, add a keyframe under the Key Info rollout. Still in the Motion tab, go to the Copy/Paste rollout and this time click the Pose button and copy your pose. Now, drag the timeslider to frame 32. Click Paste Pose, and add another keyframe. Next, go to frame 16 and Paste Pose Opposite. If you decide to play this animation, you'll see your character sliding along the ground, as if he's on ice.

Now go to frame 8, which is half-way between the first frame and frame 16, where we'll put our in-between keyframe. Since he's taking a step, we'll just move his foot up just a tad, but not too much. Usually people don't bend their knees too much when walking casually. Don't forget to assign a keyframe at frame 8. Still on frame 8, copy our pose and go to frame 24 and Paste Pose Opposite. Now we have a character that is starting to look like he's walking!


Figure 18 : Consecutive keyframes of walking animation

Double-Click on the Biped's Center of Mass, which will select everything except for your mesh. Hide the Biped. In the Perspective Viewport, play the animation. Lookin' good!

This was just a very basic walk cycle. It's up to you to add personality to your character. There are many books and resources available showing movements and talking about timing that can help you in your quest to be a great animator. See Appendix I for some resource links.

Part 4: Exporting

 
One of the most important parts of Cal3D is the MAX plug-in that allows artists to export their animated characters to a format that the programmers can use. Using the exporter correctly requires a lot of attention to detail, so listen up!

Before we export our model, we need to make our textures according to what Cal3D likes. Each material on your character MUST have a slot in the material editor, and these materials must be named properly with a number or Tag starting with 0. Example:
 
Pants [0]
Shirt [1]
Face [2]
Arms [3]
Shoes [4]

Now we are ready to export the model using Cal3D's exporters. The latest exporters can be found at http://sourceforge.net/projects/cal3d. It is important to export the SKELETON FIRST. Make sure that the Biped is in FIGURE MODE, and select his Center of Mass. Under the file menu, click Export. Now select the Cal3D skeleton exporter, and type a name for your skeleton. A dialog box will appear with all of the bones in your Biped checked. Just hit next and finish, and you've got your Cal3D skeleton!

After the skeleton is exported, you can export your materials, meshes and animations in any order you want. When exporting your mesh objects or your animation, the dialog box will ask you for a skeleton, which if you hit browse, you'll see the skeleton file you just created. When exporting the animation file, make sure your Biped is NOT in figure mode. You will then be given the choice of FPS and the selection of keys to export. Also, if you change your material at all, you have to re-export it AND the mesh again, as that tag is saved in both the mesh and the material's Cal3D file.

A bit about Cal3D's Spring system. When exporting your mesh, you are given the option to enable the cloth spring system. Before you do this, make sure your mesh is set up properly, or MAX will crash. First, make sure every polygon in the mesh has the same smoothing group. I've also heard that there can only be one material applied to the mesh. Now assign a weight to the vertices, with 0.0 being your rigid vertices, and anything greater than 0.0 will give those vertices a cloth-like property, with the higher number being more springy. Now just export the mesh and enable the spring system check.

After everything is exported, create a .cfg file that contains all the information about the files that make up your character. This can be created using any text editor. When writing the list of included materials, it MUST be done so that the material tagged with [0] appears FIRST in the list, with the second being [1], etc. I've found it's easier just to name my exported materials with tags as well, so I know in what order to place them.

Knowing all this about exporting, here is a sample .cfg:


################################################
#
# Jason Tutorial - Cal3d cfg File
#
################################################

scale=0.5

################# Skeleton #################

skeleton=Jason_skeleton.csf

################# Meshes #################

mesh=arms_and_hands.cmf

mesh=body.cmf

mesh=Jason_head.cmf

mesh=shoes.cmf

mesh=slingshot.cmf

mesh=slingshot_band.cmf

################# Animations #################

animation=jason_walk.caf
animation_strut=jason_strut.caf
animation_running=Jason_run.caf

################# Materials #################

material=pants.crf

material=shirt.crf

material=jason_face.crf

material=brown_hair.crf

material=jason_arms.crf

material=puma_shoes.crf


On the Cal3D website, you can download a mini-viewer that is used to view and test your models. All you have to do is drag your .cfg file over Cal3d_miniviewer.exe and it will run your model. You can also run it manually on the command line by typing in Cal3d_miniviewer.exe whatever.cfg, with the name of your cfg file replacing whatever.cfg.

I've taken you through the steps of rigging a character, animating him, and then exporting him, and now it's your turn to start creating characters and giving them life. Have fun with it, and always observe people and their movements! Also, in movies, it can be fun to  slow down the motion, and visually take note where the weight distribution is and the timing of everything. This can be really fun during action sequences, such as the many in The Matrix, or Lord of the Rings.


Appendix I:  Animation Resources


For further learning, here are some great resources on character animation, and it's principles & timing:

Tricks to Animating with a Computer
- Jon Lasseter
http://www.siggraph.org/education/materials/HyperGraph/animation/character_animation/principles/lasseter_s94.htm

Character Animation: Principles and Practice - Michael B. Comet
http://www.comet-cartoons.com/toons/3ddocs/charanim

Principles of Traditional Animation Applied to 3D Computer Animation
http://www.siggraph.org/education/materials/HyperGraph/animation/character_animation/principles/prin_trad_anim.htm

Contrapposto - Sculpture Posing
http://www.siggraph.org/education/materials/HyperGraph/animation/character_animation/contrapposto.htm

Learning to Walk - George Maestri
http://www.siggraph.org/education/materials/HyperGraph/animation/character_animation/walking/learning_to_walk.htm
  
3D Character Animation: Posing and Staging
http://www.techtv.com/screensavers/showtell/story/0,24330,3356118,00.html